DNS issue affecting some Vodafone customers.

Some Vodafone customers may be experiencing problems when trying to connect to certain websites.

The issue appears to be caused by Vodafone's DNS. DNS Stands for 'Domain Name System' and is responsible for turning website names into an internet address which your computer can understand.
For example, you may type pegasus-town.co.nz into your web browser. Your computer would ask a DNS server where this website is located and the DNS server would return the address of the website - in this case: 103.250.232.50.

At present, Vodafone's DNS service is not always sending this response properly so your device may not know where to find the website you are trying to visit. This can be resolved by setting your Vodafone modem to use a different DNS server. In this tutorial, we will be using Cloudflare's free public DNS server.

UPDATE: Vodafone have reportedly advised some customers that the issue has been resolved. If you are still having trouble accessing websites, try restarting your modem. If this doesn't help, try following the steps below to change your DNS settings.

Step 1: Log in to your Vodafone Ultra Hub modem by entering http://192.168.1.1/ in your web browser.

You will be asked to log in using a username and password. These can be found on a sticker located on the bottom of your Vodafone modem.
Please note that the username and password are case sensitive.
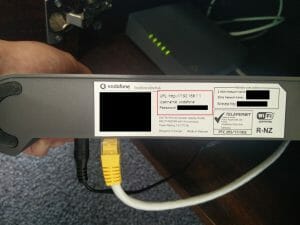
Step 2: Change the view to 'Advanced Mode'

Once you're logged in, you will see a menu at the top right of the page which says "Basic Mode". Click on this menu and select 'Advanced Mode'.

Step 3: Once Advanced Mode has been selected, click on the 'Settings' tab at the top followed by the "LAN" tab in the left hand side of the screen.
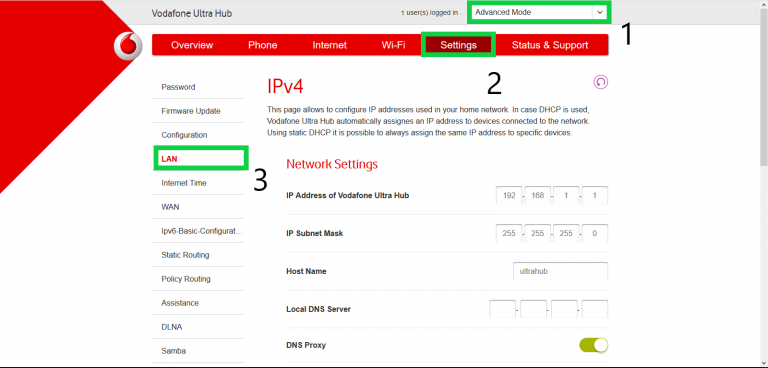
Step 4: Type in the new DNS server address and click Apply

You should now be in the LAN settings page. About halfway down this page there is a field called 'Local DNS Server' with four empty boxes next to it. Type a '1' into each box so that the field reads 1.1.1.1 as shown below.
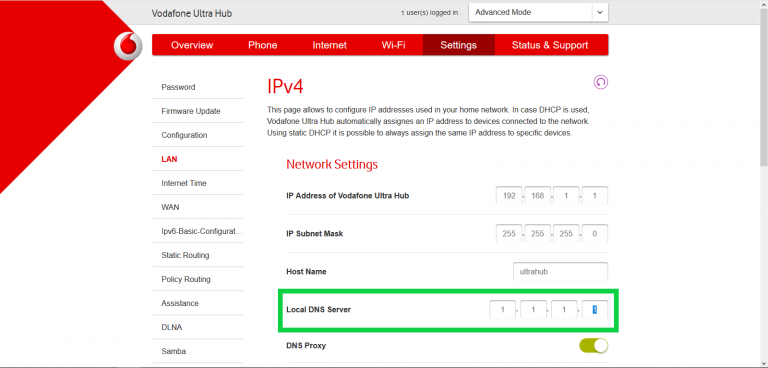
Step 5: Scroll to the bottom of the page and click 'Apply'

After you enter the new DNS server address, you will need to tell the modem to apply the new settings. Scroll down to the bottom of the page and click 'Apply'. You will soon see a message telling you that the settings have been changed successfully.
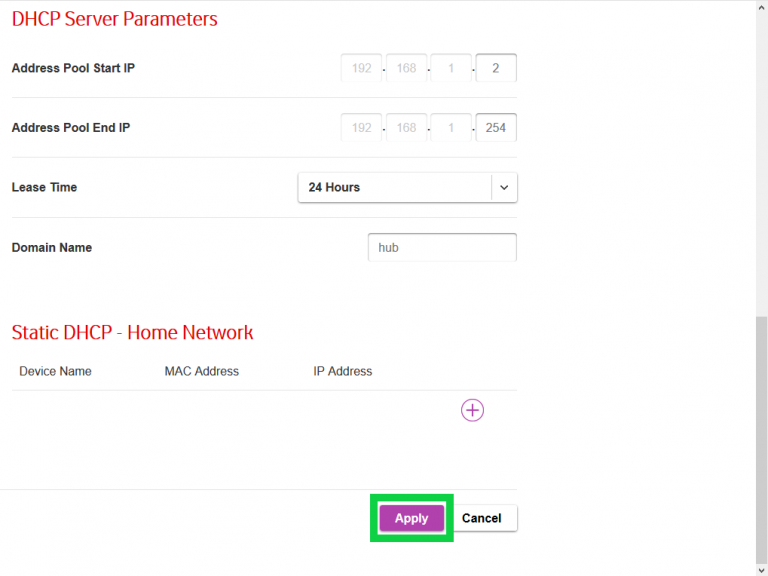
All done!

Once the settings have been applied, you can close the page and continue to use the internet.

If you're still having trouble with your connection, leave a comment on Facebook or get in touch through the contact page so I can update the guide.
Happy Browsing!

Vodafone Email Closure: What you need to know

On September 8th 2017 Vodafone NZ announced their plans to shut down their email hosting service after 20 years of offering it free of charge to home customers.

Vodafone cite technical issues as one reason for this closure and said in a press release that now is a good time for this change as many users are already moving to free online email services such as Gmail and Outlook.com.

“Since we launched our email service in the 1990’s, email and technology have grown up a lot and our customers have told us their email service is no longer delivering the sort of experience our customers need today. That’s simply not good enough for us here at Vodafone. We’ve made the decision to close the service down and connect customers who need a hand setting up a new account to the email experts, Google Gmail and Microsoft Outlook.”  - Matt Williams | Consumer Director, Vodafone NZ


In this article, we will look at the Vodafone email closure, how it affects users and what you can do to ensure your emails continue running smoothly after November 30th.


What does this mean for Vodafone email customers?

If you are a Vodafone customer and currently use a Vodafone email address (commonly ending in clear.net.nz, vodafone.co.nz or paradise.net.nz), you will need to create a new address with a different provider. Vodafone's email services will be closed down on the 30th November so customers will have until this date to move their services elsewhere.

Will I be able to keep using my old Vodafone email address?

Vodafone are offering a free forwarding service to all customers. This will allow you to have all incoming mail forwarded to an email address of your choosing. If you already have another email address, you can forward your mail there. If you do not, read on for more information on creating one.

Will I be able to keep all my existing messages?

Both Gmail and Outlook.com have options available for moving your old emails over from Vodafone's mail system. These tools should copy most of your emails to your new account. See the video walkthrough from Vodafone at the bottom of the page for more information.

What’s Next?

Do you have another email address that you would like to use? If so, Great! You can skip this step.
If you do not have another email address, you can create one for free through Google's Gmail or Outlook.com.

First, you need to choose a provider for your new email address. Two popular options are Google’s Gmail ([email protected]) and Microsoft’s Outlook service ([email protected]/[email protected]).
These services are free and include enough storage for the needs of most personal users.

To start the signup process, click the logo of your chosen email provider on the right hand side of this page.

Follow the steps on the page to create your new address. When you are done, you should be greeted with your new inbox. You can check mail here in future or load your account into your preferred email application (Windows Live Mail, Thunderbird, Outlook or Mac Mail).

Great! You’ve set up your new account. Now let’s set up forwarding for any new mail that arrives at your Vodafone address.

When Vodafone announced their email closure on the 8th September, they sent out two announcements to each customer. These emails contain a link which you can use to set up forwarding.Find one of the messages and click the link to set up email forwarding.

These messages are titled “Important news about your [email protected] email account” and “Keep your [email protected] address with free auto forward" and were sent on the 8th and the 15th of September.

An easy way to find this mail is to search your email inbox for '[email protected]'. This will show all email sent to you by Vodafone.

Moving your mail to your new account

Now that your account has been set up and your mail is being forwarded, you can import your emails from your Vodafone address to your new gmail account. Vodafone have instructions for completing this as well as a video example on their website. Click one of the links to the right to view the instructions for importing your mail.

Please note: The import process outlined on Vodafone's website will only import mail which is stored on Vodafone’s servers. If you don’t see all your mail in your new inbox after 24 hours of starting the import, the older messages may no longer be stored on the server and are probably stored on your computer. This mail can be moved manually to the new address but the steps required vary depending on which email program you use.

All Done!

Great! Your new email account should now be up and running smoothly. You'll need to allow 24-48 hours for your old mail to be moved over and your forwarding to be activated. If you have any questions about the migration process or would like help getting everything moved over, get in touch with us using the form on our contact page or by calling 0800 NETVET (0800 638 838).
We can provide assistance by phone, remote desktop connection or onsite at your North Canterbury home or business.

How to import your Vodafone emails into Gmail

How to import your Vodafone emails into Outlook.com